Never Stop Learning

Saturday 7 December 2013

Kraftyhands Blog Challenge December

Christmas Crackers


This month the challenge is for 'Anything Goes' so I decided to make some crackers with the papers from S for Santa and my Tonic die. I did have to enlarge the 6x6 papers a little to get the patterning to be correct.
I then had the challenge of making a box for them. The base is gold card and the top is acetate which fitted first time, thank goodness. The red cord is elastic and tied at the back. My grandsons where not impressed as they do not have a 'snapper' inside...hmmm but you could place a small gift inside them.

Crafty Wishes
Merry Christmas
&
Happy New Year.

Wednesday 27 November 2013

Vintage Tranport

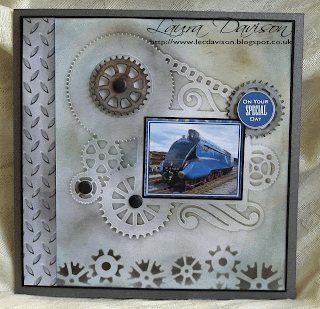
Some cards made with the new Vintage Transport CD.


I had great fun making this card using cog templates and distressing inks.


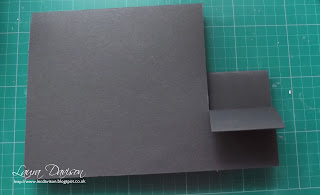
outside box card

and inside the book card.
This book card design would be great for putting small gifts in.

A large 8 x 8 card. The background was made with a cog template and distressing ink.


Smaller card made as a stepper. I used a template for the stepper from another Kraftyhands CD Twelve days of Christmas. I love the background image of the old watch and writing desk, it can be used for so many cards.

I found this image of the fairground horses and thought I had to go to town on it with glitter and gems. The ribbon is some I had tucked away with my ribbons until I found a suitable card and this was it.
A very useful gift wallet that you could use for a gift card, voucher, tickets or money.

Hope you have enjoyed a closer look.
Crafty Wishes Laura.


Friday 1 November 2013

November Kraftyhands Challenge


I have made a large card again for this months Blog Challenge. The picture of the partridge was enlarged to fit this 8 x 8 card. It is hard to see on the picture but the golden pears are glittered and decoupaged as is the number 1. The ribbon is slightly wired which made it easier to give shape to. I also used glitter around the frame of the partridge to enhance the pattern.

Please join us and play along on the Kraftyhands Blog Challenge. There is no prize this month so it is just for  FUN.

Saturday 5 October 2013

Kraftyhands October Blog Challenge

Autumn Colours


Using the scrumptious new Craft Nouveau CD. I enlarged the image, layered it on some purple mirri and added punched leaves. The leaves were too bright so I muted their colours with walnut stain. I added tree small dew drop beads in red.

Friday 6 September 2013

September Blog Challenge


Thought I would use a Christmas theme to follow the sketch.
The CD I used was S for Santa

Saturday 3 August 2013

August Kraftyhands Blog Challenge


This month I thought that as the title is 'Anything Goes' I  would try enlarging and printing an image to sew on a bag.

I created my image using the copy facility on Adobe and also added a background. I put the design together using Word.

It was then printed onto transfer paper and then ironed it onto plain cotton. I  sewed the cotton onto an existing bag which I think I bought for a £1. I left the top open and trimmed the edge with blue ribbon. The lovely apple buttons were in a huge bundle of buttons bought from Create and Craft when it first started.

The pocket it created at the front is just the right size to fit an ipad or tablet in.

The CD used is Equestrian Events.

It is the first time I have every really had a try at copying the images and playing around with them. The images remained excellent quality to resize and play with.

Saturday 6 July 2013

Pretty in Pink

July Blog Challenge


I wanted to use this lovely CD Beautiful Baroque.. After I had cut out and decoupaged the lady, I felt she looked beautiful own her own that I would use the image on a plain background.

Saturday 8 June 2013

Kraftyhands Fathers Day Card Tutorial


Thought I might post this on my pages

Hi everyone. I am going to show you how to make a very simple stepper card for Fathers Day

Materials

1   sheet A4 black card
1   sheet A4 silver mirri card or silver embossed card
1    A4 print out from Vintage Motors CD page 17 Disc 2 (easel Card)
1    A4 print out from Vintage Motors CD page 18 Disc 2
1    page from an old paper back book
4     silver card candi embellishments
My Minds Eye stamp #CTB174 tyre tread
Distress inks, Walnut Stain and Broken China

*****


This is the finished card.

*****


Step 1

Fold your black card in half and placing the fold towards the top away from you. Measure 15.5 cms along fold and along the middle of the card. Make a feint line and cut down from fold 10cm.

*****

Step 2

Fold the smaller section down, but not completely to the edge leave at least a centimetre.

*****


Step 3  Make additional folds in this narrower piece to form mountain and valley folds.


Decorating the card

Mount the main image on, silver mirri or linen embossed silver card, with a very narrow border. Do the same with the backing paper of the map.

Using your page from an old paper back book tear it and glue along the bottom portion of the easel card. When it is dry distress it with ink, I used Broken china to match the blue in the image.

Using the tyre image stamp I curved it on the stamping block and stamped across the paper with Walnut Stain to make a single tyre track.

The silver card candi is glued into each outer corner and the greet embellishment  placed in the middle with foam pads. The clock, speedometer and circle image were added to the folds of the stepper card. These would have been nice to have mounted again on images cut from circular dies but I wanted to keep the card simple.

A greeting sheet could be added for the sentiment to be written on. Use a piece of paper 12 x 24 cm folded in half it can be glued under the image along the top fold.


Hope you like the card. The technique for making the stepper card can be adapted to any topper size and you can place it in the centre, left or right of your card.

Saturday 1 June 2013

Kraftyhands June Challenge

The challenge this month is No Squares Allowed.


I love this image from the new Summer of 59 CD it is so strong and bold.

I kept the black, red and white theme going. It gave me a great chance to play with my large spellbinder dies.
I cut two circles in white and scored across the back of one about quarter the way down, glued above this line and placing the circles together the match. The back circle makes an easel type stand.

The bow is a double bow made across my fingers. I put just one layer of the ladies on from the decoupage sheet but curved them over a bone folder and using silicone glue to really lift them off the card and give a shadow.

Saturday 4 May 2013

May Kraftyhands Blog Challenge


This months challenge is floral frenzy.

I chose a stunning backing paper from Kew CD. I wanted as much of the backing paper as possible to be on view so I chose to use a A4 size card. I used my new fan die and cut it in plain white card. The images of roses are also from the Kew CD. I added hand made roses, pearl swirls and a beautiful crushed silk ribbon in green to match the paper.

I still love big cards although expensive to post, great to hand deliver and this would make a lovely card to give  from a group for most occasions:- birthday, wedding, good luck etc

Saturday 20 April 2013

Man About Town


Samples for Create and Craft 

Kraftyhands


This is an 8 x 8 card. I used two of the beautiful 6 x 6 inch papers.. wanting to show as much of the lovely papers as possible. They are overlapped the ribbon and buttons hide the joins. The leaves are made from black card and then rubbed over with gold embossing wax.


A 6 x 6 card this time. I wanted to use some of the alphabet tiles on the CD so used the word DAD floating on some bakers twine. Could be a birthday card or a fathers day card. The key is one of the new spellbinders dies. The heart and key. I used matching blue card from the matting and layering and the alphabet tile mounts. Rubbed over with gilding wax it gave the key an old steel look.


A 6 inch gate fold card. I used some wooden embellishments to match the watch. The top left embellishment is a wooden lamp post.


I decide for this card to go brighter in colours so I chose a beautiful blue backing paper and white die cuts.  Using gilding flakes for the first time I embellished around the central image. Does not show up very well on the photo.


Small 6 inch stepper card ...so quick to make. Sorry the decoupage does not looked lined up, I think it was the angle of the photograph.

Great  CD for making 'men'  cards and  the 6 x 6 papers and  ordinary backing papers are gorgeous an addition to any craft room


Saturday 6 April 2013

Kraftyhands April Challenge

Shades of Blue


For this months Blog Challenge I decided to use just the blue flowers from the Kraftyhands Die Cut Flower Kit
All the flowers are from the kit including the small roses in the centre. For the flower centers I used ordinary large brass paper fasteners, inked and embossed them.


Wednesday 13 March 2013

Iris Stepper Card

Kew CD Sample for Create and Craft


Such a simple card to make thanks to the CD. The Iris looks really 3D when decoupaged. The colours my favourite.

Monday 11 March 2013

Kew CD

Sample for Create and Craft

Tuesday 12th March  1pm and 6pm


Had great fun making this card trying out my new gold spellbinders. Little tricky to get them lined up perfectly in the middle. Love the colours of pink and turquoise in the backing paper.

Sunday 10 March 2013

Happy Mothers Day

Card made with Kew CD


The background is stamped and embossed with a bright glittery gold powder. The pink roses are handmade using a diecut. The topper is from the beautiful CD.
It would make a super Mothers Day card.

Saturday 9 March 2013

New Kew CD


Card using the  Kew CD by Kraftyhands


The background of this card is stamped with a flourish stamp and embossed in gold. I had distressed the edge of the card with Walnut Stain and found that some of the gold embossing powder stuck to it, quite like the look. The pink and yellow background is a piece of paper made at a Sheena Douglass workshop and I thought suited the image.

I coudn't find a matching colour of ribbon the correct width for the slots so I used two. I could still see the slots I had cut so I teased the ribbon upwards to disguise them.
After I had put the hatpins through the matching bow I put small beads on the
points to make them safer.

Saturday 2 March 2013

March Blog Challenge

My card for the Kraftyhands March Blog Challenge

 
This month the challenge is to follow a sketch.


I decided to follow it as exactly as I could. Working with an A3 piece of card I cut it down to be 8x8. 
I used the Fleur Francais CD and chose design 3 of the pyramid selection but only used the first layer so I had a big bold flower in the purple shade. I then chose suitable backing papers from the sets using 3 again so I knew the colours would match. I used a rich purple card to mat and layer.
For the bow tails I decided to make two in embossed silver mirri and the third in the purple card. To lift is a little I embossed it using the swiss dots embossing folder.
The sentiment is aslo from the CD and I mounted that on silver mirri card and cut a very thin border.
The three little flower heads complete the design.
The simple sketch is a good idea to keep to one side if you ever run dry of ideas it will act as a starting plan to get you playing.
 
Hope you like the card and can join us playing with this months challenge using Kraftyhands products.


Friday 1 March 2013

Kew Floral Collection

 
New hot of the press Kraftyhands CD.
Going to be on Create and Craft Tuesday 12th March 1pm and 6pm
 

Thursday 7 February 2013

Vintage Treasures

 
My Samples for Create and Craft


Tuesday 5 February 2013

Edwardian Roses


Hope you like my samples from Edwardian Roses


Saturday 2 February 2013

February Blog Challenge

Spring Colours


I love making stepper cards.
This one is made with an A4 piece of card folded in half longways and then cut into a stepper card. The spring tulips are cut from one sheet of card from the Floral Fantasia CD (one of my favourites) Instead of decoupaging the tulips I arranged them on the steps of the card. The two end panels are made by cutting the backing sheet for the card in half and re-arranging them

Wednesday 16 January 2013

Miranda and Mo are Here New Kraftyhands CD

Watch Create and Craft to see more January 17th at 9.00am and 4.00pm


This is such a fun frame to make, complete with stand that is easy to make and works properly. As soon as I saw this pink frame I knew the photo to place in it...........Me and Graham on our wedding day about to get into our car we were showered in confetti............love this picture.

Miranda and Mo Cherry Jam


This is an 8 x 8 card, my favourite size of card to make at the moment. The label tag at the side opens out to show a scrummy recipe for Cherry Jam (including some brand if you wish) I thought it would make a great card to cheer someone up who is a bit poorly, even better if given with some of the cherry jam.

Miranda and Mo


Just love the cherry backing paper on this card. Used paper doilies on top left and right hand corners.
Cherries and jam  enchanced with glossy accents to look extra sticky.